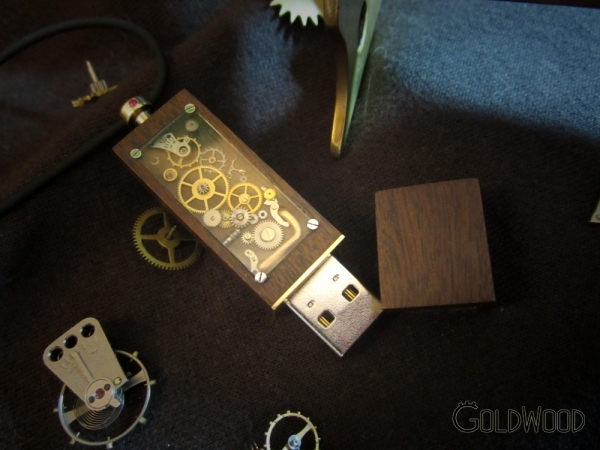
Steam Punk USB, HandMade
Hi all!!!
Always wanted to do something unusual, that it caused a feeling of admiration from fans and gave the opportunity to express themselves. What, they do not work in the style of science fiction, can satisfy hungry fans.
As that time, went to the site steampunker.ru, saw the work of the remarkable master GoldWood . However, I decided to try to do something like that. As an example, I took the job here:
 .
. Think GoldWood will not mind, knowing that his work is an example for beginners masters.
After reading komenty, treating all criticism, set a clear goal: To make such a stick, trying to load it different elements to add to the frame glass.
By purchasing the right tools, went to work (Carver , simple stationery knife blade for hacksaw, <a wax polish , sand paper, etc.)
Dear friends, I just say my main concern at the moment is to help new webmasters, arouse their interest and provide details of all the processes at work. On that I have for you nor any secrets (secret around SteamPunk-light). In my blog I will try to spread information about my work, and even the camera constantly distracted during the operation, will not stop me in time to make stuff for you!
Topic, made this way: if you are interested in more information, you can click on the link in the text. It contains a video (!), Images, or links. (!), This sign will be marked with words that contain a link to the video background information will write in on the topic.
By the way will soon open my channel Steam Dan on video sharing YouTube. I will be glad to see you there. In order not to miss the new video, you can subscribe to the feed in advance. Thank you.
Here we go!
preparation and processing details.
1. «stump»
The basis was taken some «piece of wood», delighting me for their size. After her impregnation (!) it has acquired a nice dark color and become more amenable to treatment. Began Here is a (!) . Oil that was impregnated «stump» — hemp oil. The other did not exist.
In general, suitable for the impregnation of various oils. impregnating oils .
Dried on a simple heaters with the fan. (Must be periodically cleaned with detail from oil discharge)
As the «brain» was taken 4GB flash drive <a Parse
 and drag dimensions to «stump», leaving stocks for further processing.
Cut the «stump» into its component parts:


Drill a recess for the stick. For this office knife carefully make a small indentation in the comfort of the lines marking.

With engraver recess for «brains.»
Video. Drilling deeper, with the engraver (!).
Dam Tip: To adjust the depth of penetration of the bit in detail, insert the bit into the collet to the desired drilling depth. What collet ( for beginners) .
Receive the item with an indentation for the stick:

In my each master engraver in handy in the future (bor. machine grinding. Machine-to-many names). As for the flexible shaft, depending on razmerorov, Machi and degree of heating most cars. I like and without shaft working well so far. Maybe there has not been necessary. If you are straining the price, you can buy without a shaft.
With the help of my friend engraver , we have achieved this result here *:
* Intrishka

And now, of course, more. Take the «stump» marks the region, which will be removed to the window. With stationery knife (cutter) carefully cut along the line marking rectangle and remove a small layer of fibers.
Then, using various attachments and engraver or a simple clerical blade (cutter) to get results when the hole under the window intersects with an indentation for the stick, get through hole.

cuts through the through hole (!)
2.Latunnaya Box
As a donor, was taken coin 1993. I do not know what alloy, similar to brass. Also using the engraver was cut coin, the size of the wooden base.
As for me, this method of manufacturing brass inserts was something new. I had no time to redo the part. Passing «school carving and sanding.» I call your attention to the following sequence of manufacturing brass inserts. Video material can not sovpodat with this sequence.
MAKING brass insert:
1.neobhodimo polish a coin with two sides. (You can nazhdachkoy) Polishing coins (!)
2.After how the coin got a smooth surface. Draw the border line of wooden base, placing a «stump» on the end face of the coin. Photos
3.Otmechaem future hole connector stick. Photos
4.Sverlim hole connector for USB flash drive, align it with the help of files, tips for engraving or cutting torch (just ditched all blades)
TIP: Since we are going to see only one side of the brass inserts, on the other hand to create a right angle holes, you can use the attachment for grinding and making grooves that meet at a corner. will form a right angle. It is hard to explain in words, but no video, only sketched, who can then understand. Photos
5.Vyrezaem box the size of a wooden base, leaving a small margin!!! Photos
6.Esche time to polish!
Outcome:

3. «monocle» in the box
As a «monocle» I used part of its case from the headphones — That's it!
Tip: Since Any tips from the engraver heated interaction with plexiglass because of the large turnover, in a cutting tool can be used on canvas hacksaw.
Manufactured a glass window in a brass frame:
1. Brass cut the ribbon of a thin sheet of brass. Brass band (!)
2. Hold office knife (cutter) along the middle of the tape. It is necessary that the tape fold back flat right angle. Cutting through the inside of the corner. Photos
3. Bend tape along the cut. I did so (!)
4. Flatten angles around «piece of glass»:
a) Clasping already Rolled brass band to one of the edges «monocle», marks the place where the tape is bent to form an angle. Photos
b) Next, cut at 90 *, where we have marked the line will be the center of the corner. Photos
a) Make a notch office knife (cutter) on the other side of the tape from the beginning of the corner to the edge of the tape. This notch will create a straight, smooth corner. Photos
d) does the same with all the angles. Photos
5. The bottom line:

4. Gears of the clock
For me, this process has been the most interesting and fascinating. Despite the fact that I describe it in paragraph 4 of its topic, the first step before making flash cards I made out the clock. It turns out you can make out a watch office knife (cutter).
Lay on the operating table <a «The Rocket» .
How to disassemble hours (!)
The operation was a success! All you have extracted from the patient:

5. The plastic layer
In order to separate the circuit storage device of a decorative element, it was decided to make a plastic interlayer. Just to give the light output from the LED on the circuit, I did such a tricky thing.
Tip: Make as many notches on the part of the plastic that transmits light. This is necessary, for a more intense light transmission.
That it happened (!)
Finishing
1. Grinding
In order to bring the body stick right parallelepiped form must be:1.Vyravnivaem surface with an engraver or other tools
body alignment with the engraver (!)
2. Finalizing body polishing it on sandpaper.
Tip: In order to have all elements of the case are well jointed together and had no play. It is necessary to grind the flash drive in the assembled state.
Sanding stick (!)
3. The bottom line:

2. Cover with beeswax
To create a smooth, water-repellent surface, I used beeswax. That is not the wax varnish, wax as a pleasant matte finish and a crisp feel. The wax was bought on the market, in the department of «honey.» Price is 40 rubles. Also for the treatment of wooden surfaces fit and <a wax.Describe the processing technology «piece of wood.» I warn you, as across this for the first time perhaps somewhere a mistake. If anyone saw the mistakes in processing unsubscribe request in comments.
Processing «piece of wood» beeswax.
1. Sliced wax chips in a bowl. Since wax melts faster. Photos
2. Heated shavings simple fan heater unit. Temperature was enough to melt the wax. Photos
3. With the brush, apply several layers of wax, keeping the temperature that the wax does not have time to harden.
4. Wipe with a clean cloth to remove the wax residue Video (!)
5. If necessary, polish with an engraver or other tools
Decoration
Anything made in Hand Maid should look individually. The main decorative element that causes admiring glances, was created from a set of gears from clock and leather mats.
Assembling all elements
And so, all the main parts already manufactured and processed. It remains only to collect them and stick together. I glued them in the usual glue «M» (without advertising), as item itself is unlikely to be subject to heavy impact.
gluing (!)

And finally:


I welcome your comments To, Tips at the page in the social. networks, blogs and channel on YouTube.
page of the VC: Gafuryanov Denis
Blog at steampunker.ru: SteamDen
Channel on YOUtube: Steam Dan
If you liked this thread, waiting for your komenty, huskies, and subscriptions.
Just for you, this video:
ATP all your SteamDen.
7 комментариев